Thursday 5 April 2012

Vietnamese Fresh Springrolls (Goi Cuon)

We love this recipe and have it all the time, its a great crowd pleaser, and also very healthy!
I remember the first time we had these rolls - we had just arrived in Siem Reap, Cambodia, to see the amazing Angkor Wat. We sat down in a restaurant for a drink and a bite to eat, incidentally it was supposed to be a butterfly garden, covered by a huge net. But in true Asian style there was not a butterfly to be found! The menu presented us with two options of springrolls: springrolls and fresh springrolls... Well of course we ordered the fresh ones, we wouldn't want stale ones now would we? What arrived before us was quite different to what we expected - these were not your usual Chinese style deep fried springrolls, they were delicate rice paper wraps filled with delicious, fresh, fragrant herbs and ingredients. They soon became a favourite on our travels.

If serving these for friends, the easiest is to lay out all the ingredients, and then let your friends pick their ingredients and 'roll their own'. Trust me it goes down very well :) I make mine with chicken, but you can easily use pork as well, or make them vegetarian.

Ingredients:

Chicken:
  • 1 chicken breast per person, sliced
  • Olive Oil
  • Your favourite Chinese sauce - I find the Woolworths 'Wok Sauce' works superbly, but you could also use some garlic and ginger, soy sauce or any stir fry type sauce.
Hoisin Peanut Dipping Sauce Recipe
  • 1 cup (8 oz) hoisin sauce (if sauce is thick, add about 1/4 cup warm water to reach desired consistency) - I get this from my favourite Asian food store. It really works well with this dish!
  • 1/4 cup smooth peanut butter
  • 1 Tbs rice vinegar
  • 2 garlic, crushed
  • 1 minced Thai chili, or more for desired spiciness
For spring roll rice paper assembly:
  • About 4 rice paper wrappers per person. Again, from my favourite Asian food store. The round ones work best, I use 'Erawan Brand'
  • Fresh herbs: mint, coriander, basil, or any others you like
  • Lettuce/rocket
  • Cucumber, cut into long slices
  • Bean sprouts
  • Rice Vermicelli noodles, soaked in boiled water, then drained. About 1/2 a small pack per 4 people.
Other optional extras: (less traditional):
  • Avocado (my personal favourite!)
  • Carrot, cut into very thin strips
  • Spring Onion
  • Mange Tout/Snap Peas/Baby Corn cut into strips
  • Soy or fish sauce for dipping
  • Sweet Chilli Sauce

Method:

Pan fry the chicken in a little olive oil, add the wok sauce just before the end. The chicken can be served warm or cool, depending on your preference. Don't forget to soak the noodles as well.

Make the Hoisin Peanut sauce: mix all ingredients together, and add a little warm water if it seems too thick. But don't make it too thin or it will run out of your rolls! Rather try it first.
Lay out all your ingredients on the table, including a very large flat bowl/casserole dish half filled with water. I find cold water works fine.
Take your first rice paper wrapper and place it in the water, turning if it doesn't entirely fit, for about 5 seconds, then remove and place on your plate. it will continue to soften so don't soak too long!

Layer whatever ingredients you like in the middle of the roll, but resist the urge to overfill! The hoisin sauce is supposed to be used as a dipping sauce, but we find it easiest to put it in the roll as well.
Fold in the sides, then roll the whole thing until it forms a neat parcel. Cut in half if you like, or just bite into it whole, enjoy!

Saturday 24 March 2012

Fresh Basil Pesto


To me there is nothing better than fresh, home made pesto! If you are a fan of the store-bought stuff, I'd really recommend you try this recipe, you will never go back. It literally takes 5 minutes!
 
 Serves 2

Ingredients:

  • 1 punnet of fresh basil
  • 3 tablespoons of pine nuts (available at some Woolies, Spar and Friendly Grocers)
  • A generous glug of extra virgin olive oil
  • Salt and pepper to taste
  • 1/2 clove of garlic (if you like garlic!)
  • 3 Tbsp grated Parmesan cheese, plus extra for serving
  • Pasta of your choice

Method:

  1. Place the basil, pine nuts, olive oil, salt, pepper and garlic in a food processor.  Process for as long as you like, depending on how fine you like your pesto. I like it quite fine.
  2. Add the Parmesan and process again. Assess the consistency, if too dry add a bit more olive oil. If too wet, add a little more cheese or pine nuts.
  3. Cook your favourite pasta in boiling salted water until al dente. My favourite is definitely gnocchi, it's an awesome combination with this dish. The gnocchi only needs 2-3 minutes - it is done when it floats.
  4. Once cooked, drain the pasta, and return to the pot and mix with the pesto. Cook briefly over medium heat, to warm the pesto.
  5. Serve in bowls, sprinkled with pepper and Parmesan, with a side salad if you like.

The Best Lasagne. Ever.

This is one of my favourite recipes. It takes a bit of time, but is well worth it! This should be enough for at least 4 people, but I recommend you double the recipe and make two lasagnes and freeze one for next time! It tastes even better if made the day before, or even if just the mince is made the day before...

Ingredients:

For the meat sauce:
  • Oil
  • 1 Large white or red onion, very finely chopped
  • 5 Stalks celery, finely chopped
  • 2 Cloves of garlic, crushed
  • 500g Extra lean beef mince
  • 1 Punnet passata (or 1 tin of chopped tomatoes)
  • 75 mls Tomato paste (or one small packet or tin)
  • 1 punnet of button mushrooms, sliced (or 1 tin sliced mushrooms)
  • 1/2 Cup Red Wine
  • 1 Tbsp Sugar
  • 1 Tbsp paprika
  • About 2-3 Tbsp of your favourite fresh herbs (I like basil, Italian parsely or thyme in a meat sauce) dried ones also work ok but use no more than 2 Tbsp
  • 2 Bay leaves
  • Salt and pepper to taste

For the Bechamel (cheese) sauce:

  • Approx. 1 litre milk
  • Pinch freshly grated nutmeg
  • 75g Butter
  • 75g White Flour
  • Salt
  • White pepper
  • 1 Cup Grated cheddar cheese
 For the final assembly:
  • 1 box (250g) of lasagne pieces, I like the spinach ones
  • Grated Mozzarella cheese for the top
  • Parmesan cheese to serve

Method:

  1. Preheat your oven to 180 degrees Celsius about 30 minutes before putting you dish in.
  2. Make the meat sauce first: heat a glug of oil in a non stick pan or wok, then fry the onions and celery until they start to soften. Add the garlic and fry another minute.
  3. Remove the onion mix from the pan and heat some more oil until it is quite hot, then add the mince in batches to brown it. Browning the mince properly is the hardest part, because as soon as it releases its water, no further browning will occur. So make sure your oil is hot, your mince is at room temperature, and you don't brown too much at the same time... If you don't get it right it's not the end of the world, but the browning does really enhance the flavour.
  4. Once all your mince is browned, you might want to drain some of the fat from the meat, then add all the mince and the onions back into the pan. Add the pasatta, tomato paste, mushrooms, paprika and sugar and reduce the heat to simmer. 
  5. Add the herbs, bay leaves and salt and pepper to taste. Leave this to cook while you make the sauce - ideally the longer it cooks, the better the flavours develops, so you could do this the night before, or let it cook for about 1 1/2 hours. Keep an eye on it, though, and add water if it is drying out. The final product should be the consistency of bolognese sauce, not too dry and not too watery. Remove the bay leaves before assembly.
Now make the cheese sauce: this is a real art, which was taught to us by a chef couple we briefly shared a flat with in London...the trick is not to pay TOO much attention to the quantities in the recipe, rather keep an eye on the consistency as you go.
  1. Heat the butter in a large pot on medium heat, until just melted. Add the flour gradually and use a whisk to mix it in with the butter. The amounts may vary from the recipe - what you are looking for it a thick and oily consistency, but not dry. if you have added too much flour by mistake, you can add a bit more butter until it seems right. After making this a few times you will get a better feel for how much sauce you actually get based on the amount of butter you start with...
  2. Fry the flour for a minute or so - this is the key to a good white sauce as the heat pops the flour, removing that 'floury' taste you sometimes get.
  3. Start adding the milk slowly, whisking as you go. Again, check the amount to get the right consistency - you are looking for a thinner than custard consistency, remember the cheese will help to thicken to sauce further.
  4. Add salt and pepper to taste and nutmeg, and let the sauce simmer for 3 minutes, whisking frequently.
  5. Finally add the grated cheese, again continually whisking. Simmer until all the cheese is melted, and the sauce is at your desired consistency, similar to that of yoghurt or custard, not too thick as it will still thicken further in the oven. Adding more cheese will thicken it further, more milk will thin it. Do not add more flour at this point as you will then get that floury taste!
Assemble your Lasagne:
  1. Grab a large casserole dish - preferably a square or rectangular one as the rounded edges make the pasta more challenging! If making only one lasagne, layer half the meat sauce on the bottom of the dish (if two lasagnes, it will be a quarter and so on). Place your lasagne sheets over the meat layer, making sure they don't overlap, but covering as much of the meat as possible.
  2. Now layer half of the cheese sauce over the pasta sheets, covering the entire area.
  3. Repeat the three layers - meat then pasta then sauce, trying to avoid mixing them too much (this is where you don't want your sauces to be too sloppy!).
  4. Finish with the grated mozzarella cheese, and sprinkling of paprika (I like to make a kind of pattern), and cover with foil (shiny side down!).
  5. Place in the preheated oven for 30 minutes. For the last 10 minutes, remove the foil and cook uncovered. You will know the dish is done when it
  6. Serve with crusty Italian bread, salad and Parmesan cheese. Ad maybe a robust red wine!

Greek Feast


 We always call this dish "Greek Feast". Actually its probably not really Greek at all, but its the name that stuck... I guess "Mediterranean Pitas" would have been a better name but it doesn't have the same ring to it.

It serves 2


Ingredients:

  • 2-4 Lamb chops, depending on size
  • 4 Pita breads (I like the wholewheat ones) or tramazzinis
  • 1 Red and 1 yellow pepper
  • 2 Small to Medium Brinjals (Aubergines)
  • Balsamic Vinegar
  • 1 tsp Sugar
  • Olive Oil
  • 1 Tub of Humus (I'd love to make my own but honestly just haven't had the time)
  • Some pre-made falafels, if you can find (again, I should be making my own!)
  • 1 Small tub (250ml) greek yoghurt
  • 1 Clove of garlic, crushed
  • Ground Cumin
  • 10 Cherry Tomatoes, halved
  • 1/4 of a red onion, finely chopped
  • 10 Cucumber slices, quartered
  • Some Greek feta, cubed
  • Some Kalamata Olives, pitted

Method:

  1. Start by roasting the veg: preheat your oven to 200 degrees Celsius.
  2. Cut the top off the brinjals, then cut them into slices, about 10 cm thick, I like to do this lengthways.
  3. Place the brinjals into a bowl of boiled water and microwave for around 5 minutes. You will see I cook with these a lot, for some reason I really love them, although I know a lot of people don't! If you really don't, just omit them, but I challenge you to try them in the way I cook them. The secret is to boil them first - the problem with brinjals is they are like little sponges. If you try to fry them, they will just soak up all the oil, they just can't get enough. Boiling them allows them to soak up the water and soften, before adding any oil.
  4.  De-seed the peppers, and cut them into roughly 4-5 chunks. Then add the peppers and brinjals to a large roasting tray and sprinkle with olive oil, salt and pepper. I like to keep the two veg separate, and then add a splash of balsamic vinegar and 1 tsp of sugar to the peppers, this helps them to caramelise nicely.
  1. The veg may need 20 minutes or so - keep an eye on them as the peppers ay start to go black, and any thin parts on the brinjals will cook very quickly. 
  2. When you are happy the veg are almost done, grill your chops until done as desired. 
  3.  While they are grilling, mix the yoghurt with the garlic, a pinch of salt and pepper, and a sprinkling of cumin.
  4. Halve the pitas and then add to the oven for the last two minutes, just to heat up.
  5. Serve all of the ingredients nicely presented in bowls, and allow your guests to stuff their pitas as they please. I like to coat the inside of the pita with humus and yoghurt, followed by the roasted veg, and then the salad ingredients. Usually there isn't space for the meat, but that could be sliced and squeezed in or just eaten on the side (or easily omitted for a healthier vegetarian meal!).
  6. Add any other ingredients you fancy - avocado would go nicely, and I have even served this with roasted butternut and sweet potato - ideal if you have more guests and you would like more variety.


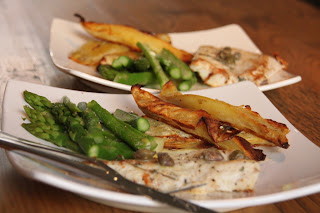
Kingklip in a Lemon Butter Sauce with Asparagus and Roasted Sweet Potatoes

Serves: 2
Since I found out my cholesterol was high, I have been trying to have less red meat in my diet, and more veg, lean chicken and fish. So you will see a lot of these types of recipes in the blog! Including more fish has opened up a world of new delicious tastes, and I have been trying new fish varieties every week. This recipe uses Kingklip, one of South Africa's best loved fishes. Unfortunately I found out after buying the fish that is it actually orange on the Sassi (Southern African Sustainable Seafood Initiative) list (www.wwfsassi.co.za<http://www.wwfsassi.co.za>) I do think we should all be aware of conservation in what we eat and buy. Luckily this recipe will work just as nicely with any firm white-fleshed fish. I was shocked to find that amongst the list of orange fishes are hake, east-coast sole, prawns and yellowfin tuna!

I decided to include sweet potato in this recipe, perhaps a bit of an odd choice, but it's one of my absolute favourite starches, and you just can't beat it roasted! It's also lower GI than normal potatoes. I thought the combination really worked, but you could also roast regular potatoes, or serve with rice.

Ingredients:

  • 2 medium or 1 large sweet potato
  • Olive oil
  • Salt
  • 400g firm fleshed white fish, filleted
  • 1 tablespoon fresh thyme
  • 1 clove of garlic, crushed (if you like garlic!)
  • 2 tablespoons lemon juice
  • 2 tablespoons butter
  • 2 tablespoons fresh cream (I used the reduced fat variety)
  • Black pepper
  • 8 Capers
  • Green asparagus spears

Method:

  1. Preheat the oven to 190 degrees.
  2. Peel the sweet potatoes, and cut lengthways into 4. If very large, the slices can be cut in half again. Place in hot water and microwave for 5 minutes, just to soften them before roasting. Then lay them in an oven tray, coat with olive oil and a sprinkling of salt, and roast for about 45 minutes, until crispy and cooked through.
  3. Once the sweet potatoes are nearly done, heat some olive oil in a non-stick pan and fry the fish fillets with the garlic and thyme. Cook for about 3 minutes on each side, depending on the thickness, the fish should come out slightly browned on both sides, and should form large flakes. Do not let it dry out. Add the capers in the last minute of cooking the fish.
  4. In the meantime, boil your asparagus for about 4 minutes in salted water, until they are starting to soften.
  5. Melt the butter, and then mix with the cream. Heat this lightly in the microwave or a small pot. Just before serving, add the lemon juice and black pepper.
  6. Plate up by placing the fish, asparagus and sweet potatoes neatly on a dinner plate. Spoon the capers on top of the fish, and the sauce over the fish and asparagus.

Monday 27 February 2012

Crispy Baked Potatoes with Chicken Breasts in a Creamy Yoghurt Sauce

Crispy baked potatoes with chicken breasts in a creamy yoghurt sauce
Serves: 2

This is a delicious and really healthy recipe for those of us watching our weight/cholesterol.

Ingredients:

  • 2-4 whole baking potatoes (Woolies are the best!)
  • Splash of olive oil
  • Salt
  • 2-4 chicken breasts
  • 2 Shallots or 1/2 an onion, chopped very finely
  • Black pepper, freshly ground
  • 1 chicken stock cube
  • 1/2 cup of boiled water
  • 1 clove of garlic, crushed (if you like garlic!)
  • 2 teaspoons of paprika
  • 1/2 teaspoon cumin
  • 500g fat free plain yoghurt
  • Your choice of veg to serve (I like a mix of cauliflower and broccoli as they go extremely well with the sauce)

Method:

  1. Bake the potatoes well in advance, they need around 90 minutes depending on the size. Preheat the oven to 180 degrees. Place the unpeeled potatoes whole in a roasting tray and rub olive oil and salt over them. Bake them in the oven for around 90 minutes, keeping an eye that they don't get too brown and hard.
  2. Place your stock cube, the water, the shallots, black pepper and chicken breasts in a non-stick pan and cook over medium heat. This is a wonderful cooking method as it requires no oil. It really doesn't require a lot of water, if the water reduces a lot, it's ok, as that will help the chicken to brown. But if the onions are getting dried or burned, top up with a little water. Simmer for around 15 minutes. Do not add salt at this point as the stock can be quite salty.
  3. Add the paprika and cumin, followed by the yoghurt. Let this sauce simmer for a while and thicken a bit.
  4. Steam or boil your vegetables, you shouldn't need to add any butter as the sauce will go well with the veg.
  5. Plate up by cutting a cross through the top of the potatoes, give them a little squeeze and then place the chicken and veg, with a generous helping of the sauce on top. Finish with a sprinkling of paprika, some chopped basil and some freshly ground black pepper.

Anchovy and Olive Fettucine


Serves 2

If you like anchovies, and the equally strong salty tastes of olives and capers, you will love this easy pasta dish! If you don't, perhaps try something else on the blog, although I do think bacon would make a good alternative to the anchovies...

Ingredients:

  • 1 white onion
  • 1 garlic clove, crushed
  • 1 red Chilli, chopped and seeds removed if less heat is desired
  • 1 small carton of passata - this is "crushed tomatoes" - please note the difference between passata and tomato purée - purée is much more concentrated and would be WAY too strong for this dish. Passata is available in most stores now, in either bottles or cartons. If you really can't find it, use a tin of tomatoes and blend them fine if you prefer a less chunky sauce (I do)
  • Half a cup of red wine
  • Salt and pepper to taste
  • About 12 olives, pitted and cut in half lengthways
  • About 15-18 capers
  • 1 tin or bottle of anchovies, you will need 4-6 anchovies per serving, a small tin would have just enough
  • Your favourite combination of fresh herbs - this time around I used thyme in the sauce, and sprinkled chopped parsley on afterwards. Oregano would also work, but basil is my favourite.
  • Fresh or dried Fettuccine
  • Grated pecorino cheese (Parmesan would also work)


Method:

  1. Chop the onion really fine and start frying in olive oil on high heat for about 3 minutes.
  2. Add the garlic and fry a little longer.
  3. Add the chopped chilli, followed by the passata, wine and salt and pepper. Remember not to use too much salt as the dish has a lot of salty ingredients. Add the olives and capers, and the thyme if using it.
  4. Let the sauce simmer on medium heat for as long as you like, at least 10 minutes. Remember the longer it cooks, the better the flavours develop, but also check it frequently and top up with water if it is drying out.
  5. 15 minutes before serving, boil some salted water in a large pot. Once boiling add the Fettucine. Keep tasting it to make sure you take it out when it is 'al dente' and don't overcook it!
  6. Drain and then dish the Fettucine into large bowls, followed by the tomato sauce. Arrange the anchovies on the top - they don't really need to be cooked in the sauce, as they would just disintegrate... Sprinkle any chopped fresh herbs over the top, followed by some grated pecorino, freshly ground pepper and maybe a drizzle of olive oil. Serve with a robust red wine. Enjoy!

Pork Noodle Salad

Pork Noodle Salad
Serves 4

This is a really healthy, easy and delicious dish. It uses no oil at all, and plenty of fresh ingredients. I got the recipe from a recipe book called 'delicious noodles' from Woolworths, which my lovely mother in law gave me (no sarcasm intended here, she really is lovely!) You will need some slightly interesting items for this dish - most of which can be found at Woolies these days. If you don't come right, it's time to find your local Chinese supermarket! Mine is in Rivonia in the Wedge Centre, inside a Chinese restaurant. They have everything I could ever need, at reasonable prices, and since they are also a restaurant, they are open til late!

Ingredients:

Asian broth:
1 cup (250ml) Chicken stock
Handful of fresh coriander stalks
2 kaffir lime leaves (ideally fresh but I usually use the dried ones from my Chinese supermarket)
Thumb sized piece of ginger, sliced

Salad:
Pork mince (yes the recipe calls for pork mince, which is something you seldom see in our supermarkets, so I have always used stir fry pork, or pork fillet which can be cooked whole and sliced later. Chicken breasts also work very nicely)
250g exotic mushrooms (the recipe calls for "black fungus" which is something I have never seen sold. Even if it was, I'm not too sure it's something I would want to eat! So I use enoki, shimeji, or shiitake mushrooms, which I can usually find at pick n pay. Any mushrooms will do...)
100g dried rice vermicelli noodles
1 small red Chilli, seeded and finely sliced
2 shallots, finely chopped
2 spring onions
2 calves garlic, crushed, or 1 teaspoon minced
3 tablespoons lime juice (since limes ant easy to find, I use lime juice in a bottle from my Chinese store)
3 tablespoons fish sauce
1 1/2 tablespoons palm sugar (I usually just use brown sugar, but you can get palm at Woolies these days)
1/4 teaspoon ground white pepper
1/2 fresh coriander leaves
Lettuce to serve - I like Cos or baby gem, but it's up to you
Cucumber, cut into half sites, to serve
Lime wedges to garnish
Long fresh red Chilli, seeded and cut into strips, to garnish
Extra coriander leaves to garnish

Method:

1. To make the Asian broth, place the stock, coriander stalks, lime leaves and ginger in a saucepan, simmer until the liquid has reduced to around 3/4 cup. Strain and return to the pan.
2. Slice the mushrooms thinly. Soak the rice vermicelli noodles in boiled water for around 6-7 minutes, or until soft. Drain and cut into 3cm lengths. Combine the noodles, mushrooms, Chilli, shallots, spring onion and garlic.
3. Add the mince, pork or chicken to the broth, and boil until cooked through. Drain and then add the vermicelli mixture.
4. Combine the lime juice, fish sauce, sugar and pepper and stir well. Add to the meat with the chopped coriander and mix well. Taste and add salt if necessary.
5. To assemble, tear the lettuce and arrange on a serving dish. Spoon the meat and noodle mixture over, followed by the cucumber, coriander and Chilli, with the lime wedges on the side.
6. I like to serve with soy sauce and sweet Chilli sauce on the side, in bowls with chopsticks.

Sunday 26 February 2012

A Simple Valentines Dinner

Serves: 2 of course :)
Prep Time: Less than 30 mins per dish

For Valentines this year I decided to make a really simple, quick, healthy and hopefully delicious 3 course meal. For inspiration, I looked up "aphrodisiac" foods, and picked the following, before trying to decide what to make with them. I came up with: asparagus, pine nuts, strawberries, champagne, alcohol and chocolate. So the menu was:

Starter: Warm Asparagus and toasted Pine Nut salad with a balsamic reduction
Main: Thai Salmon Fishcakes with an Asian Cucumber Salad
Dessert: Strawberries soaked in Champagne, with Cointreau truffles and Melted Lindt Dark Chocolate

Course 1:

Ingredients:
  • Green asparagus, thin if possible
  • Pine nuts, sometimes difficult to find, but I usually get them from Spar. They are surprisingly expensive, and are cheapest at a friendly grocer if you have one near you
  • Rocket or your favourite lettuce variant
  • Cherry tomatoes, halved
  • Balsamic reduction, available at most stores, I got mine at spar and was pretty happy with it
Method:
  1. Boil a pot of salted water and cook the asparagus briefly, until they are softened but still crunchy. 
  2. In a separate pan, heat a little olive oil and toss the pine nuts in it until they start browning slightly. 
  3. While the asparagus are cooking, arrange the rocket on side plates. Drain the asparagus and arrange them over the rocket, half facing one way and the other half perpendicular, creating a nice pattern. 
  4. Finally, place the cherry tomatoes on top, followed by the pine nuts. Drizzle a good glut of extra virgin olive oil over, followed by the balsamic reduction, which you can use to make a decorative pattern as well. Finish with salt and pepper to taste.

Course 2: Thai fish cakes.

I got this recipe from Anthony Worrel Thompson, of recent kleptomaniac fame... http://www.bbc.co.uk/food/recipes/thaifishcakesservedw_73733 I have made a few changes as you will see in the below.
For the fish cakes

  •  500g fish fillets (I used half hake and half salmon, worked beautifully)
  •  ½ red pepper, chopped
  •  2 red chillies, chopped (seeds removed)
  •  2 tbsp coriander
  •  3 spring onions, finely chopped
  •  2 cloves garlic, chopped
  •  1 stalk lemongrass, tender part only, chopped (I occasionally find this at Pick n Pay, and then buy and freeze for whenever i need them)
  •  1 tbsp fish sauce (available at Asian Supermarkets, and sometimes Woolies)
  •  125ml coconut milk
  • 1 whole egg
  • Vegetable oil
  • Fresh Coriander leaves to serve

 For the Thai cucumber salad

  • 1 (or half) cucumber peeled, halved length ways and de-seeded
  • 35g caster sugar
  • 50ml rice vinegar (available at Asian Supermarkets)
  • 2 hot chillies, finely diced (I often use1/4 teaspoon of sambal oelek - Indonesian chili sauce, available at Woolies)
  • 2 shallots, finely diced
  • 2 tbsp chopped coriander leaves
  • 40g roasted peanuts, chopped (optional)
  • ½ tbsp nam pla (fish sauce) (optional)

 Method:

  1. Cut the fish into small pieces. Place the pepper, chillies, coriander, spring onions, garlic, lemongrass and fish sauce into a food processor and blend to a paste.
  2. Add the fish pieces to the paste and blend well. Mix to a smooth paste adding coconut milk and egg.
  3. Place the mixture in a bowl. Chill in refrigerator overnight or for at least two hours.
  4. Half-fill a heavy-based frying pan with oil and heat over a medium to high heat. Shape the chilled paste into small patties with the help of a spoon. Carefully lower the fish patties into the hot oil, in batches (the oil should reach halfway up the sides of the patties). Fry until crisp and brown, turning once during cooking. Remove from the oil using a slotted spoon and set aside to drain on kitchen paper. Repeat the process with the remaining fish patties.
  5. For the salad, cut the cucumber in to 5mm slices
  6. Dissolve the sugar in the vinegar and toss the cucumber slices in it. Fold in the chili, shallot and coriander.
  7. Sprinkle with the peanuts and fish sauce just before serving.


Course 3:

Ingredients:
  • 1 punnet of strawberries
  • 1 slab of Lindt dark chocolate with Chili, or your favourite variant, I think white chocolate would also work extremely well
  • 1 box of truffles, I used cointreau caramel truffles
  • 1 bottle of white champagne (you will use only a little, so serve the rest with the meal!)
  • 3-4 tablespoons of caster sugar
  • 2 tablespoons icing sugar
Method:
  1. At least 2 hours before serving, place the strawberries in a bowl with a splash of the champagne, and all the caster sugar, and leave in the fridge to sweeten. 
  2. When you are nearly ready to serve, heat 3-4 pieces of the chocolate in a double boiler over gentle heat. Add a little milk if you would like to make it runnier. 
  3. To plate up, arrange the strawberries and chocolate truffles on a serving plate, and either dip each strawberry in the chocolate, or drizzle the melted chocolate over them. Sprinkle everything with sifted icing sugar, and if you desire, serve with shot glasses of baileys/cape velvet strawberry, with a dash of butlers strawberry liqueur.

Introduction to this blog

About me and this blog...

My name is Nicki and I am definitely not a chef... I am just someone who is passionate about food! I have two other passions: travel and photography.  I would like to try and bring a flavour of both of those in here, but the primary focus is food. My inspiration is one of my favourite websites, also a combination of the three, called fxcuisine, check it out at www.fxcuisine.com.

My parents brought me up trying all sorts of different foods, from many different cultures,  German to Chinese. My Mom is an amazing cook and my Dad also comes out with some pretty impressive dishes, so food was a big part of my upbringing. When friends used to visit when we were kids, my parents would serve up dishes they had never tried, saying it was part of their "culinary education".

As I got older, I started to travel a lot, and my tastes broadened, every new trip, we'd come home with "souvenirs" of new favourite dishes and accompanying recipes. At the moment my favourite cuisines are Vietnamese, Thai, Indian, Japanese and Italian.

I love to surprise family and friends with interesting dishes at dinner parties, and they often ask for recipes, so the idea is that I'll post them here where anyone can access and try them. I'll try to always acknowledge the source of the recipe, and add some extra tips for preparation from experience plus where to buy ingredients if you're from South Africa.  I'll also try to post as many pictures as possible, as practise for my new hobby of food photography.

I hope you enjoy the blog! Please feel free to follow it to always get the latest updates, and to post comments or questions, or even requests for other recipes.